Search This Blog

Friday, September 23, 2011

Certificate Chain is Invalid / Problem Deploying Lync Server 2010

Hello Everybody,

SomeTimes While Deploying Microsoft Lync Server 2010 , when it comes to Requesting and Assigning Certificate for the Lync Services It will Fail with the Following Error:

A certificate chain processed, but terminated in a root certificate which is not trusted by the trust provider. (Exception from HRESULT: 0x800B0109)

To solve this Error you will need to Download the Certificate chain from your Certificate Authority , and install it in the Lync FE .

How To Do That Step - by - Step:
  • Open An Internet Explorer at the Lync FE server ( the One You Are Running the Installation Wizard on it).
  • Write the URL of the Certificate Authority Server e.g. ( Http://ca.contoso.com/contoso-ca)
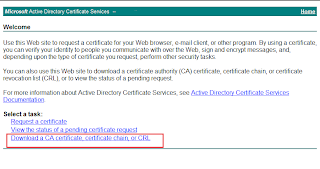
  • Click on "Download a CA Certificate, Certificate Chain, or CRL"
  • In the next Page click on "Download  CA Certificate Chain"
  • Click Save and save the Cert. to the Desktop.
  • now you will need to import, Click Start, Run and type MMC.
  • Press Ctrl+M
  • From the Left Menu Double Click "Certificates"
  • From the Certificate Snap-in Window, Select "Computer Account" and Click Finish
  • Click Ok
  • Now Expand the Certificates Menu and double Click "Trusted Root Certificate Authorities"
  • Right Click Certificates >> All Tasks >> Import

  • In the Import Certificate Wizard Welcome Page Click Next

  • Browse to the Desktop and select the downloaded Certificate ( make sure that file Type is All Files)
  • Click Next
  • Click Next
  • Click Finish
By this You had imported the Certificate and try now to re-request the certificate for Lync Services in the Deployment Wizard and it will NOT fail .

if these Steps werent Clear Enough for you , please use the Following Link

Tuesday, September 13, 2011

Microsoft Lync 2010 Server Address Book Normalization

As in Precious version of Clients , any phone Numbers stored in AD "Active Directory" phone Attributes using the E.164 formats will be displayed by Lync Client on both Contat Call menu , and contact card Details.

For example the Pattern +97112345678901 is populated on the AD and will appear on the Lync Call menu and contact card.

but if the Pattern is 0097112345678901 or 97112345678901, Lync server will fail to normalize it into E.164 and so , will not appear on the Lync Contact Card or call menu.


In order to display Number formats that not E.164 , Lync Server will need to be manually configured to properly normalize those numbers.

Configuring Address Book Normalization

By default normalization is already enabled in Lync Server which can be verified by the viewing the Lync Server’s current Address Book configuration.

to Verify this :
Open Lync Server Managment Shell (using account with Admin Previliges ) , and write the following Command:
Get-CsAddressBookConfiguration


the UseNormalizationRules Value should be Already Set to "True".

Now locate the Lync Server’s shared directory which was configured during the initial server deployment. The file server FQDN and share name can be identified in the Topology Builder under File Stores.

Browse to the share directory on the server and locate the ABFiles subdirectory.
\\LyncFEserver\LyncShare\1-WebServices-1\ABFiles

Create a new text file named Company_Phone_Number_Normalization_Rules.txt in the ABFiles directory. This normalization rules file must be stored in this location and not down a few directories where the actual address book files are stored as it was in Lync server.

Edit the file with Notepad and enter the following example normalization and translation patterns. This rule will apply to the users configured with phone numbers in this standard 14-digit format: 0097112345678901. (The first three lines are commented out and are not required in the text file.)

this Normalization rule will remove the First two Digits (00) and Add (+) instead. to convert it to the E.164 formats.

##
## Normalization rule to convert the 14-digits number starting with (00) to E.164 format
##
^00(\d{12})$
+$1

Save the changes to the Txt File and close it.
Now you will need to Update the address book for Lync Server for the new Configuration to take place,

this might take up to 5 minutes to happpen.

To Update the AddressBook use the following Command-line in the Lync Management Shell:

> Update-CsAddressBook

after 5 mintues sing out and sing in again to your Lync Client and the Phone numbers will be appearing in Lync Dial menu.